Showing posts with label Samsung Stock Rom. Show all posts

Samsung J7 Pro SM-J730F 7.0 Nougat root file & rooting tutorial

Samsung J7 Pro SM-J730F 7.0 Nougat root file & rooting tutorial
ested Samsung J7 Pro SM-J730F 7.0 Nougat root file & rooting tutorial
This tutorial will guide you to safely Root Samsung J7 Pro SM-J730F 7.0 Nougat with Auto root. The Process is very simple and easy, I am TESTED this root & write the article. just follow the step by step guide to Root.
"Root is needed if you want to Flash Custom ROMs and kernels.You can tweak your phone, overclock the CPU and use rooted application after rooting your device."
Warning:
I am not be held responsible for any kind of damage occurred to your Samsung J7 Pro SM-J730F 7.0 Nougat while following this tutorial. Do it at your own risk. Remember rooting android device may void your warranty. This is only for Samsung J7 Pro SM-J730F 7.0 Nougat Models Not others variant.
Step By Step Guide
- Make sure your device has more than 50% battery.
- Download Root file (LINKPassword: gsma2z) from the download section above and unzip the file.
-Setup Samsung Usb Driver (LINK) properly.
- Now Boot your Samsung J7 Pro SM-J730F 7.0 Nougat device into Download Mode. just power off your device and then press, Volume Down + Power + Home. Press Volume Up now to continue to Download Mode.
-Then Connect the phone to your PC via USB cable and the ODIN (LINK)application would notify an added message.If not then check the USB cable or re-install Samsung usb driver.
- choose AP or PDA in Odin Menu and select the CF-Auto-Root-j7y17lte-j7y17ltexx-smj730f.tar.md5* file (You have downloaded and Unzipped, the .tar extension).
- The re-partition is not ticked in the Odin.
- Now click on the start button to start the Flashing process.
- Once the process is completed, you would notice the RESET or PASS message on the ODIN screen.
- Connect your device via USB to your PC.
Now Unlock your device.
For more info or face any problem please contact
Read More

Samsung J8 SM J810F Firmware Flash File Stock rom

Samsung J8 SM J810F Firmware Flash File Stock rom
This blog about of mobiles software problem & Solution. You find all information about android, windows mobiles, iphones- flashing, unlocking, box setup, Flash tools, firmwares. You also get easy tutorial & solution.
Here I have shared Samsung Galaxy J8 SM J810F Firmware Flash File Stock rom Repair Firmware. This File is Tested by me, You can easily Download from our link. Giving you fresh Firmware Download link. There is a short Description  & photos of your File.
Stock Firmware
J810FJXU1ARF2_J810FOJM1ARF2_XSG_8.0
Model SM-J810F
Model Name- Samsung Galaxy J8
PDA/AP Version J810FJXU1ARF2
CSC Version J810FOJM1ARF2
MODEM/CP Version J810FXXU1ARF2
Product code INR
Region Of Ind — Ind
Android OS Version 8.0.0
***Download from Samsung Galaxy J8 SM J810F Firmware Flash File Stock rom Google drive link. Downloaded file contains the firmware file Only.
What is Flashing or upgrading firmware-
- ***Flash means Re-installing a different version of Operating System. A Flashing make your mobile as a new condition.
Important Steps:  Backup any wanted data before starting the update process. Charge your mobile phone to be at least at 90% of its charging level. Write down the current firmware version of your mobile phone, You may need it in case of anything happen during the update process.
Notice: When you have a firmware package with one file inside, Then no need to check Re-Partition option,
 And never use PIT file too, All you should do is selecting the one file as PDA file, and perform the other explained steps.
For more info or face any problem please contact

Read More

Samsung Galaxy J3 SM-J320AZ Android Rom

Samsung Galaxy J3 SM-J320AZ Android Rom
Samsung Galaxy J3 SM-J320AZ Android Rom download Original Firmware. Get Official Stock Firmware (Flash File) Link On Your PC That Stock Rom File Compress in zip package  with drivers,Flash Tool & Stock Rom.

Samsung Galaxy J3 SM-J320AZ Android Rom

File Name: J320AZTUU1APC4_J320AZAIO1APC4_5.1.1_USA_4Files.zip
Country: USA
Android Version: 5.1.1
File Size: 1.14GB
How To Flash: See Tutorial

Download

How To Flash Samsung Stock Rom

Step 1: Download Samsung Galaxy J3 SM-J320AZ Android Rom and extract it on your Computer.
Step 2:  Download and install Samsung USB Driver on your PC. Skip this method If you have already installed the Samsung USB Drivers.
Step 3: Now, Download and extract Odin Flash Tool on your PC. After extracting, you will get the Stock Rom File, Flash Tool, Driver and How-to Flash Guide.
Step 4: See Full Detail How Flash Stock Rom in your Samsung Smartphone

Follow Instructions

Readme Once:

Take a Backup of your Samsung Galaxy J3 SM-J320AZ Smartphone because after flashing all data remove.
This is the Official Stock Rom Release by company all data is original for recover your device if you got software error, hanging error, update error dead issue and boot loop.
Read More

Samsung Galaxy Note 5 SM-N9200 Android Rom

Samsung Galaxy Note 5 SM-N9200 Android Rom
Samsung Galaxy Note 5 SM-N9200 Android Rom download Original Firmware. Get Official Stock Firmware (Flash File) Link On Your PC That Stock Rom File Compress in zip package  with drivers,Flash Tool & Stock Rom.

Samsung Galaxy Note 5 SM-N9200 Android Rom

File Name: SM-N9200_20160922_N9200ZHS3BPI3_N9200ZZH3BPI3_6.0.1.zip
Country: Hong Kong
Android Version: 6.0.1
File Size: 1.66GB
How To Flash: See Tutorial

Download

How To Flash Samsung Stock Rom

Step 1: Download Samsung Galaxy Note 5 SM-N9200 Android Rom (Flash File) and extract it on your Computer.
Step 2:  Download and install Samsung USB Driver on your PC. Skip this method If you have already installed the Samsung USB Drivers.
Step 3: Now, Download and extract Odin Flash Tool on your PC. After extracting, you will get the Stock Rom File, Flash Tool, Driver and How-to Flash Guide.
Step 4: See Full Detail How Flash Stock Rom in your Samsung Smartphone

Follow Instructions

Readme Once:

Take a Backup of your Samsung Galaxy Note 5 SM-N9200 Smartphone because after flashing all data remove.
This is the Official Stock Rom Release by company all data is original for recover your device if you got software error, hanging error, update error dead issue and boot loop.
Read More

Samsung Galaxy S8 SM-G950U Android Rom

Samsung Galaxy S8 SM-G950U Android Rom
Samsung Galaxy S8 SM-G950U Android Rom download Original Firmware. Get Official Stock Firmware (Flash File) Link On Your PC That Stock Rom File Compress in zip package  with drivers,Flash Tool & Stock Rom.

Samsung Galaxy S8 SM-G950U Android Rom

File Name: G950USQU1AQFJ_G950UOYN1AQFJ_SPR_4file.zip
Country: Spint (Cdma)
Android Version: 7.0
File Size: 3.4GB
How To Flash: See Tutorial

Download

File Name: G950USQU1AQG4_G950UOYN1AQG4_VZW_4file.zip
Country: USA (Verizon)
Android Version: 7.0
File Size: 3.53GB
How To Flash: See Tutorial

Download

File Name: G950USQU1AQGA_G950UOYN1AQGA_TMB_4file.zip
Country: USA (T-Mobile)
Android Version: 7.0
File Size: 3.38GB
How To Flash: See Tutorial

Download

How To Flash Samsung Stock Rom

Step 1: Download Samsung Galaxy S8 SM-G950U Android Rom (Flash File) and extract it on your Computer.
Step 2:  Download and install Samsung USB Driver on your PC. Skip this method If you have already installed the Samsung USB Drivers.
Step 3: Now, Download and extract Odin Flash Tool on your PC. After extracting, you will get the Stock Rom File, Flash Tool, Driver and How-to Flash Guide.
Step 4: See Full Detail How Flash Stock Rom in your Samsung Smartphone

Follow Instructions

Readme Once:

Take a Backup of your Samsung Galaxy S8 SM-G950U Smartphone because after flashing all data remove.
This is the Official Stock Rom Release by company all data is original for recover your device if you got software error, hanging error, update error dead issue and boot loop.
Read More

Galaxy J2 Firmware download [stock ROM, all variants]

Galaxy J2 Firmware download [stock ROM, all variants]


Samsung Galaxy J2 Firmware

Galaxy J2 2015 (1st Gen)

Firmware not available.

Galaxy J2 and Galaxy J2 Pro 2016

Model No.DateFirmware Download Link (Fast and Free)
SM-J210F09 Aug 2017Android 6.0.1 Marshmallow | Version: J210FDDU0AQH2 | Filename-J210FDDU0AQH2_J210FODD0AQG9_SLK.zip
SM-J210F28 Jul 2017Android 6.0.1 Marshmallow | Version: J210FXXU0AQG4 | Filename-J210FXXU0AQG4_J210FODD0AQG4_SLK.zip
SM-J210F10 Apr 2017Android 6.0.1 Marshmallow | Version: J210FDDU0AQD1 | Filename-J210FDDU0AQD1_J210FODD0AQD1_SLK.zip
SM-J210F10 Apr 2017Android 6.0.1 Marshmallow | Version: J210FXXU0AQD1 | Filename-J210FXXU0AQD1_J210FODD0AQD1_SLK.zip
SM-J210F09 Mar 2017Android 6.0.1 Marshmallow | Version: J210FDDU0AQC1 | Filename-J210FDDU0AQC1_J210FODD0AQC1_SLK.zip
SM-J210F09 Mar 2017Android 6.0.1 Marshmallow | Version: J210FXXU0AQC5 | Filename-J210FXXU0AQC5_J210FODD0AQC5_SLK.zip
SM-J210F22 Nov 2016Android 6.0.1 Marshmallow | Version: J210FXXU0APK4 | Filename-J210FXXU0APK4_J210FODD0APK4_SLK.zip
SM-J210F22 Nov 2016Android 6.0.1 Marshmallow | Version: J210FDDU0APK8 | Filename-J210FDDU0APK8_J210FODD0APK8_INS.zip
SM-J210F03 Nov 2016Android 6.0.1 Marshmallow | Version: J210FXXU0APK1 | Filename-J210FXXU0APK1_J210FODD0APK1_SLK.zip
SM-J210F22 Aug 2016Android 6.0.1 Marshmallow | Version: J210FDDU0APH1 | Filename-J210FDDU0APH1_J210FODD0APH5_INS.zip
SM-J210F05 Aug 2016Android 6.0.1 Marshmallow | Version: J210FXXU0APH2 | Filename-J210FXXU0APH2_J210FODD0APH2_SLK.zip
SM-J210F12 Jul 2016Android 6.0.1 Marshmallow | Version: J210FXXU0APG1 | Filename-J210FXXU0APG1_J210FODD0APG1_SLK.zip
SM-J210F27 Jun 2016Android 6.0.1 Marshmallow | Version: J210FDDU0APF5 | Filename-J210FDDU0APF5_J210FODD0APF8_INS.zip
SM-J210F09 Jun 2016Android 6.0.1 Marshmallow | Version: J210FXXU0APF4 | Filename-J210FXXU0APF4_J210FODD0APF4_SLK.zip

Galaxy J2 Prime (model no. SM-G532M)

Model No.DateFirmware Download Link (Fast and Free)
SM-G532M23 Aug 2017Android 6.0.1 Marshmallow | Version: G532MUMU1AQH1 | Filename-G532MUMU1AQH1_G532MUUB1AQI2_TPA.zip
SM-G532M11 Jul 2017Android 6.0.1 Marshmallow | Version: G532MUMU1AQG5 | Filename-G532MUMU1AQG5_G532MPNG1AQG1_PNG.zip
SM-G532M28 Apr 2017Android 6.0.1 Marshmallow | Version: G532MUMU1AQD2 | Filename-G532MUMU1AQD2_G532MUUB1AQD2_TPA.zip
SM-G532M29 Mar 2017Android 6.0.1 Marshmallow | Version: G532MUMU1AQC3 | Filename-G532MUMU1AQC3_G532MUWT1AQC2_UFU.zip
SM-G532M13 Mar 2017Android 6.0.1 Marshmallow | Version: G532MUMU1AQC1 | Filename-G532MUMU1AQC1_G532MPNG1AQE1_PNG.zip

Galaxy J2 Ace (model no. SM-G532G)

Model No.DateFirmware Download Link (Fast and Free)
SM-G532G24 Jun 2017Android 6.0.1 Marshmallow | Version: G532GDXU1AQF3 | Filename-G532GDXU1AQF3_G532GOLB1AQF2_XXV.zip
SM-G532G29 May 2017Android 6.0.1 Marshmallow | Version: G532GDDU1AQE3 | Filename-G532GDDU1AQE3_G532GODD1BQE4_INS.zip
SM-G532G09 Mar 2017Android 6.0.1 Marshmallow | Version: G532GDDU1AQC5 | Filename-G532GDDU1AQC5_G532GOWN1BQC5_SLK.zip

How to download correct firmware file

This is the important part!
Be sure to check and find the correct the model no. of your Galaxy J2. Then based on your device’s model no., look for the appropriate firmware build from above.
You can identify the model no. using an app called Droid Info, or simply check it on its packaging box, or under Settings > About. Another solid trick would be to look at the packaging box of your device (in case you can’t power on the device because it is bricked).
Now that you know the model no., download the latest firmware from above for that model no. exactly.
Next, install the firmware on your Galaxy J2 by following the guide linked right below.

How to Install Firmware

First, read our disclaimer, then take backup and then follow the guide below to install the firmware.
Disclaimer: Installing an official firmware through Odin doesn’t void your device’s warranty, but it remains an unofficial process and thus you need to be cautious of it. In any case, you only are responsible for your device. We won’t be liable if any damage occurs to your device and/or its components.
Backup, backup, backup! Create an appropriate backup of contacts, pictures, videos, songs and other important files stored on your device before proceeding with the steps below, so that in case something goes wrong you’ll have a backup of all your important files. Sometimes, firmware installation may delete everything on your device! Like, when you change the CSC of your device, knowingly or not.

Step-by-step Firmware Installation Guide

Let’s see how to install the firmware on your Galaxy J2. Make sure you have more than 30% battery on your device.
Step 1. Make sure you have downloaded the correct firmware file on your PC. See above for how to download correct firmware file for your Galaxy J2 and download links.
Step 2. Install Samsung USB driver (method 1 on the linked page) first of all. Double click the .exe file of drivers to begin the installation. (Not required if you have already done this.)
Step 3. Also, download Odin PC software (latest version).
Step 4. Extract the firmware file now. You can use a free software like 7-zip for this. Install 7-zip, then right click on firmware file and under 7-zip, select ‘Extract here’. You should get a file in .tar.md5 format now. (You may get 4 or more files, with AP, BL, CP or CSC etc. written at the beginning of those files.) We will be loading this file into Odin, to be installed on device (in step 10 below).
Step 5. Extract the Odin file. You should get the Odin exe file (other files could be hidden, hence not visible).
Step 6. Disconnect your Galaxy J2 from PC if it is connected.
Step 7. Boot into download mode:
      • Power off your device. Wait for 6-7 seconds after screen goes off.
      • Press and hold the three buttons Volume down + Home + Power together until you see Warning screen.
      • Press Volume Up to continue to download mode.
Step 8. Double click on Odin .exe file (from step 5) to open the Odin window as shown below. Be careful with Odin, and do just as said to prevent problems. 
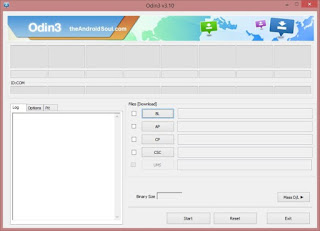
Step 9. Connect your device now using USB cable. Odin should recognize your device. It’s a must. When it recognizes, you will see Added!! message appearing in the Log box in bottom left, and the first box under ID:COM will also show a no. and turn its background blue. Look at the pic below.

      • You cannot proceed until you get the Added!! message, which confirms that Odin has recognized your device.
      • If you don’t get Added!! message, you need to install/re-install driversagain, and use the original cable that came with device. Mostly, drivers are the problem (look at step 2 above).
      • You can try different USB ports on your PC too.
Step 10. Load the firmware file into Odin. Click the AP button on Odin and the select the .tar.md5 file from above.
Load the firmware files(s) on your device. This depends on how many files you got in step 4 above upon extracting the firmware .zip file.
Case 1: If you got a single .tar/.tar.md5 file, then load this into AP tab of your Odin software. Then go to next step.
To load the file, click on AP tab, select the single firmware file starting with AP text, wait for it to load, and then skip to step 11, ignoring the rest of the part of this step.
Case 2: If you got more than one .tar/.tar.md5 file, then you must be having files starting with AP, CSC, Home_CSC, BL, CP, etc. stuff. In this case, choose the files as following. Select the firmware files as follows.
      • Click on BL tab, and select the file beginning with BL text.
      • Click on AP tab, and select the file beginning with AP text.
      • Click on CP tab, and select the file beginning with CP text.
      • [Different] Click on CSC tab, and select the file beginning with HOME_CSC text. If HOME_CSC file isn’t available, then select the file beginning with CSC text.
About CSC file: Using the HOME_CSC file won’t reset your device, and data on the phone shouldn’t be deleted. However, when we select regular CSC file, and it results in CSC on device being different than that in CSC file, your phone will be formatted automatically. You can even choose to ignore loading the CSC file, that may do alright too. But if it doesn’t works out, repeat the whole process and select CSC file this time around.
      • Info: When you load files, Odin checks the md5 of firmware file, which takes time. So, simply wait until that’s done and the firmware file is loaded. Don’t worry if Odin gets unresponsive for a while, it’s normal. Binary size will also show up in Odin.
        Step 11. Click on Options tab, and make sure Re-partition check box is NOT selected. Don’t use PIT tab, ever.
        Go back to Log tab now, as it will show the progress of firmware installation when you hit start button in next step.
        Step 12. Verify that everything is okay as mentioned above. When satisfied, click the Start button on Odin now to start flashing the firmware on your device.
        Wait till installation is finished, after which your device will reboot automatically. You’ll get PASS message as shown below upon successful installation from Odin.
        Some errors you may run into, and with respective solution.
            • If Odin gets stuck at setup connection, then you need to do this all again. Disconnect your device, close Odin, boot device into download mode again, open Odin, and then select the file and flash it again as said above.
            • If you get FAIL in the top left box, then also you need to flash the file again as stated just above.

        That’s it. Let device restart automatically.
        First start of the device may take time, so wait patiently again. When it has, verify the installation. Check the Settings > About device, to confirm new build no. based on the firmware you just installed.
        Need help? Sure let us know via comments below.

        Firmware Benefits

        You can use the firmware for variety of purposes, which includes:
            • Fix your Galaxy J2 if it’s giving you force closes errors and restarts randomly.
            • Unbrick your Galaxy J2 if it’s bootlooping and stuck at logo when restarting.
            • Go Back to Stock on your Galaxy J2 — helps when looking to sell the device, or fix installing OTA updates if broken.
            • Restore Galaxy J2 to factory state.
            • Upgrade your Galaxy J2 to newer Android version.
            • Downgrade your Galaxy J2 to lower build no. at same Android version.
            • Unroot your Galaxy J2.
            • Remove custom recovery like TWRP and CWM, if installed, on your Galaxy J2.
        To perform any of the above, simply install the firmware meant for your device, as per its Galaxy J2 firmware in Settings > About device.
Read More